New Feature

Jul 10, 2026

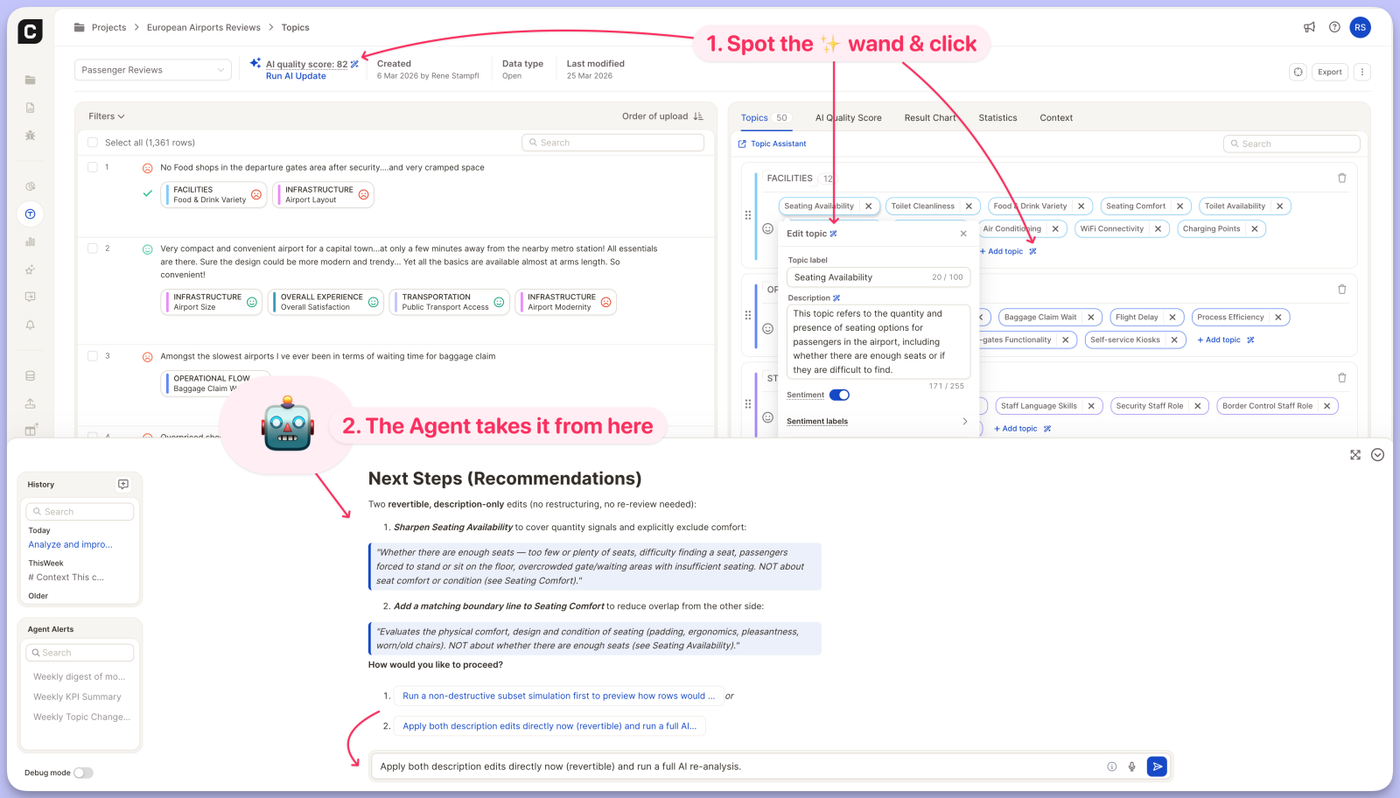
You no longer have to explain to the Insight Agent what you want it to work on. A small magic-wand icon now sits next to the parts of your project where the Agent can help — click it, and the Agent opens with a ready-to-run prompt already filled in for that exact element. We're starting with the Topics view, and you'll see the wand appear next to more elements across Caplena over time.

What's new

Look for the ✨ icon next to these elements in your Topics view:

  • AI quality score"Optimize the AI quality score"
  • Add topic"Suggest more topics for category {CATEGORY}"
  • Edit topic"Analyze and improve assignment of topic {TOPIC} in category {CATEGORY}"
  • Topic description"Improve description for topic {TOPIC} in category {CATEGORY}"

Each prompt is automatically filled with the right context — the category and topic you're looking at — so you can send it as-is or tweak it first. When you click the icon, the Agent panel opens automatically so you can see the prompt land and hit send.

Why it matters

The Insight Agent can already optimize topics, sharpen descriptions, and lift your AI quality score. The hard part was knowing where to start and how to phrase the ask. These shortcuts remove that step: the Agent now meets you exactly where the work is, with the context already in hand.

Give it a try in any Topics view — just look for the wand.

Jun 25, 2026

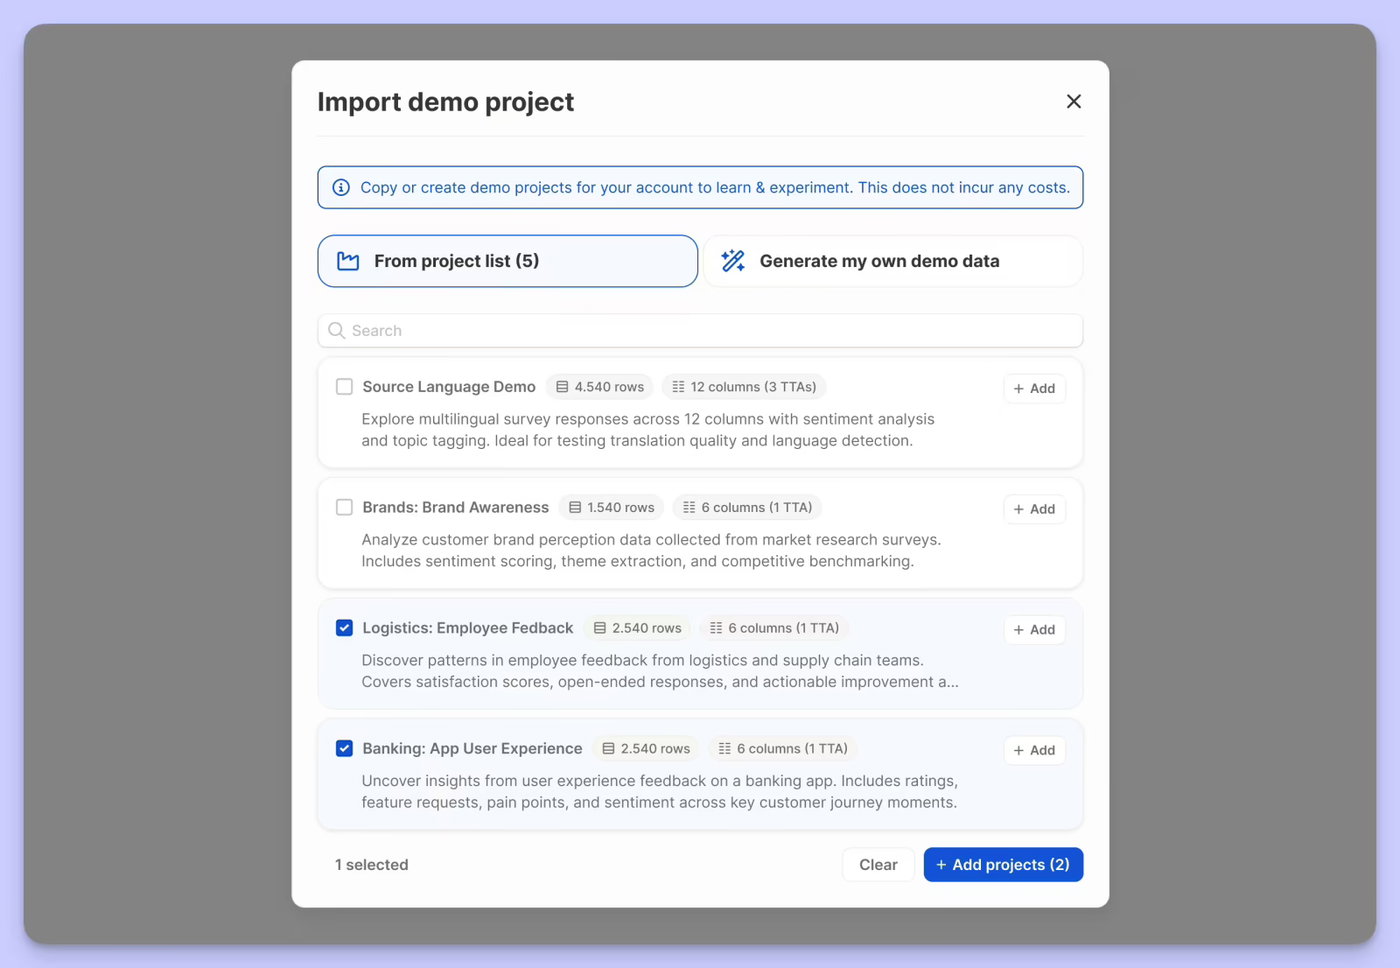
Getting started with realistic data just got a lot more flexible. You can now either pick from a curated list of pre-built demo projects — spanning different industries and research types — or generate your own from scratch by describing your use case and letting Caplena create a fully analysed project tailored to it.

Whether you're onboarding a new team, exploring a use case before committing real data, or just want to see what Caplena can do, demo projects are now a first-class way to get there.

Jun 17, 2026

Keep your topic collection in sync across projects — without rebuilding from scratch.

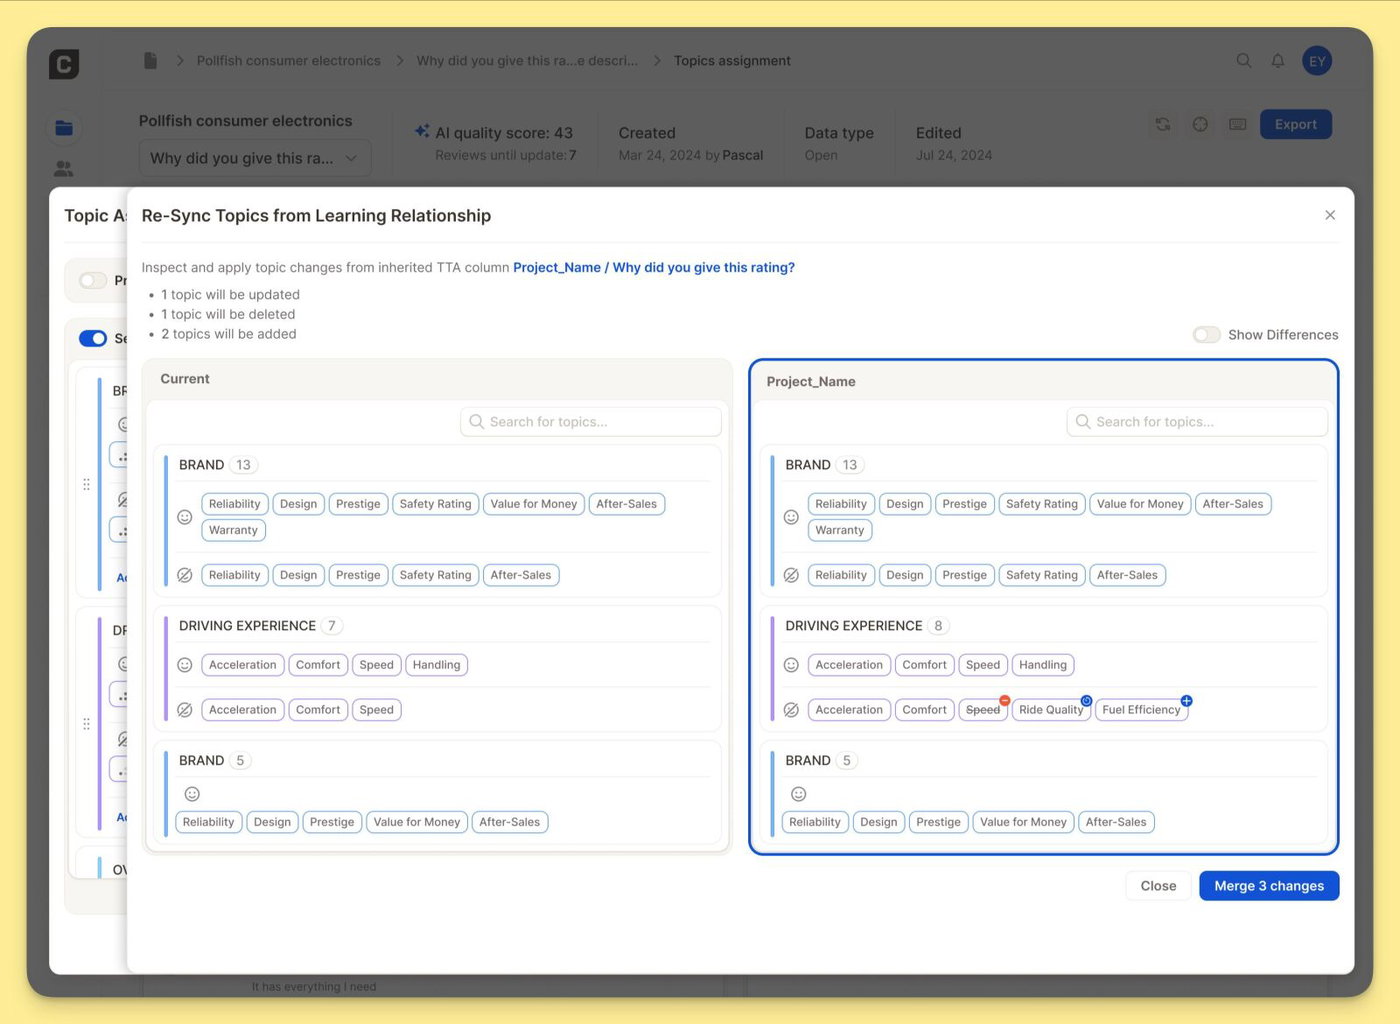
Large trackers evolve, but changing a live topic collection is risky: one edit can affect trend lines, reports, and stakeholder trust. The Learning Relationship gives you a structured way to manage that evolution. Link a development project to your production project, experiment on a representative sample, and push only validated changes back into your live tracker.

How it works

Link two projects in Settings: In Topic Settings, select a source project under Learning Relationship — typically a development project that mirrors your production tracker at a smaller sample size.

Re-sync when you're ready: Use Re-Sync Topics from Learning Relationship to see your current topics next to the linked project's topics. Enable Show Differences to highlight exactly what has changed — topics to update, delete, or add. Nothing is applied until you choose to merge. One click pushes the validated changes into your current project

Want to set this up for your tracker? Reach out to your CSM — they'll help you get started.

May 29, 2026

We are excited to introduce the Caplena MCP Server, seamlessly integrating your preferred AI applications with Caplena’s Insight Agent. This new capability empowers you to leverage insights within your AI app to help taking action based on customer feedback.

Key Features

Seamless AI App Integration

Versatile Connectivity: Connect Caplena's Insight Agent to leading AI applications such as Claude, Copilot, Codex, ChatGPT, and more. Our MCP supports a wide range of AI tools, ensuring that you can leverage our insights wherever you work.

Dynamic Usage: Use insights generated by our Insight Agent directly within your AI application. Whether it’s replying to colleagues’ questions about customer feedback via email, creating a comprehensive PowerPoint report with embedded insights, or prioritizing your project backlog based on customer feedback, Caplena MCP has you covered.

Requirements for Access

Project Status: To take full advantage of Caplena MCP, ensure that your projects are set to "live" status. Only live projects can be accessed and utilized via the MCP, ensuring that you are working with the most current and relevant data.

Getting Started

Activate the MCP in the Integrations Page

Connect Your AI Applications: This step is specific to your AI app, ask it with a prompt or consult the documentation on how to install an MCP server.

Utilize Insights: Start using Caplena insights in your AI applications to enhance communication and decision-making.

May 22, 2026

Use Caplena to analyze Zendesk support tickets effortlessly

Key Features:

1. Easy Setup: Connect your Zendesk account to Caplena in just a few clicks.

2. Daily Sync: Automatically sync ticket data for up-to-date analysis.

3. Advanced Text Analytics on conversations: Gain insights into trends, issues, and sentiments. Powered by our conversation analysis feature.

Check our documentation to see how to connect your Zendesk account in Caplena to get started.

May 19, 2026

The LLM-powered translation in Caplena now understands your project — not just your words.

Context-aware, from the start

Translation has always been tricky when your data contains industry jargon, brand names, or survey-specific terminology. Generic translation tools don't know that "Comfort" is a fabric softener brand, or that "awareness" in your survey means something very specific.

That's why we've added context to the translation process. Caplena in the new LLM based translation now passes your project description and column descriptions directly to the LLM when translating — so it understands what it's translating, not just the words themselves.

Why this matters

For most everyday language, translation works well out of the box. But the real difference shows up in edge cases: brand names that shouldn't be translated, product-specific vocabulary, or subtle phrasing that carries meaning in your survey context. With added context, the LLM can make smarter, more faithful translation decisions — right where it counts.

How to use this?

Select the LLM based translation when creating the project.

Apr 14, 2026

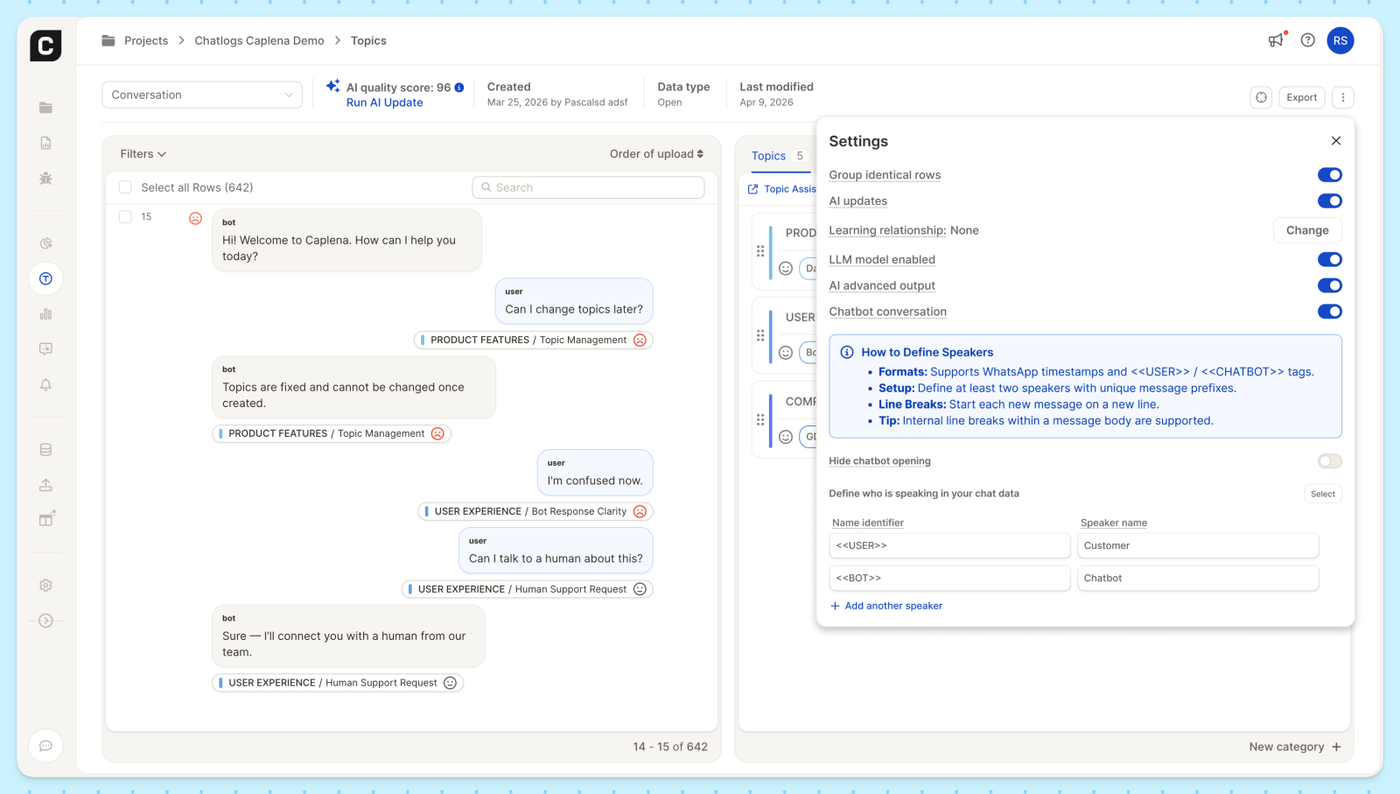
You can now analyze full chat(bot) conversations — not just individual comments — directly in the Topics View.

See the full picture

When you enable Chatbot Conversations, Caplena displays each row as a threaded conversation between speakers, with bot and user messages shown in context. Every message is individually tagged with its topic and sentiment, so you can see exactly where a conversation shifts from a product question to a support request.

Easy speaker setup

Define who's who in your data by mapping name identifiers (like <<USER>> or <<BOT>>) to readable speaker names such as "Customer" and "Chatbot." Caplena supports WhatsApp-style timestamps and common chat export formats out of the box, and you can add as many speakers as you need.

Enable Chatbot Conversations in your project's Topics settings to get started.

Apr 13, 2026

We've completely reworked how you create and manage segments in Caplena — making it faster, more flexible, and a lot more powerful.

Create Segments Your Way

The new Segment Editor gives you two ways to get started: manually or via AI prompt.

If you know exactly what you're looking for, the Manual path lets you build segments by combining filters — topics, categories, sentiment, rating, date range, and more. You get precise control over exactly which responses land in each segment.

Prefer to move faster? Use the new Create Through Prompt option: just describe what you're looking for in plain language, and Caplena will generate the segment for you. Great for exploring your data or quickly setting up common groupings without having to configure each filter by hand.

Create Multiple Segments at Once

One of the most requested improvements: you can now create multiple segments in a single flow, rather than going back and forth through the editor one by one. Select the values you want to work with and create segments from them in bulk — a big time-saver when you're setting up a new project or reorganizing an existing one.

Full Control Over Segment Appearance & Visibility

Once a segment exists, editing it is straightforward. You can update the name, adjust the filters, and pick a custom color from a full color picker (in manual- or in auto-assign mode) — so your segments are easy to tell apart at a glance in charts and tables. 

You can also control visibility: choose which segments are shown or hidden in your views, keeping things clean when you're working with a large number of groups.


The updated Segment Editor is available now across all projects via Edit Master. Give it a try and let us know what you think.

Mar 30, 2026

Automating your workflow just got much easier. You can now schedule alerts, notifications, and recurring tasks directly through the Insight Agent using a natural conversation.

Instead of navigating through multiple settings, simply tell the Insight Agent what you need, and it will set up the recurring task for you.

What’s New:

  • Conversational Scheduling: Just ask the Insight Agent to schedule an alert or recurring task. For example, simply type: "Send me a week-on-week KPI summary each Monday at 08:00" and the agent handles the rest.
  • Auto-Optimized Prompts: The Insight Agent automatically translates your quick request into an optimized prompt to ensure you get the best possible data summary in your inbox.
  • Customizable Delivery: Open any scheduled alert to modify its frequency (One-off, Weekly, Monthly, Quarterly), adjust the time, or change the recipient to yourself or another team member.
  • Centralized Alerts Dashboard: Keep track of all your active recurring tasks, agent prompts, and notifications in a dedicated "Alerts" overview page.

How to use it:

Open the Insight Agent inside any project and type your scheduling request. Once the agent confirms, your new alert will appear in the Agent Alerts section on the left-hand panel. You can click on it at any time to edit the details or trigger a test alert to see exactly what the notification will look like.

Mar 27, 2026

Get a clear, consolidated view of your team's platform engagement. The new Usage dashboard brings Caplena's cross-project visibility to team administration, keeping resource tracking lean and intuitive.

Key Features:

  • Cross-Project Tracking: Filter activity by Project, User, or specific Report.
  • Flexible Timeframes: Track engagement & compare usage data across custom rolling periods or absolute date ranges.
  • Granular Breakdown: Review exact usage numbers per user and project in the detailed data table.

How to access: Go to your Team settings > Usage.
Note: This tab is only visible to users with Team Manage permissions.

Mar 25, 2026

To get the most accurate answers from Caplena’s Insight Agent—especially when querying your data via Slack, Microsoft Teams, or ChatGPT, the AI needs to understand the blueprint of your project.

We’ve rolled out a few structural updates to reduce AI guesswork and make the Insight Agent even more powerful:

  • 10x More Project Context: We’ve increased the character limit for your Project Context from 500 to 5,000 characters. You now have the space to thoroughly brief the AI on the specific nuances, background, and goals of your dataset.
  • Default Date & Score Columns: You can now explicitly define which columns represent your primary timeline (e.g., Review Date) and primary metric (e.g., Rating). By setting these defaults once, the AI immediately knows how to accurately track trends and weigh sentiment without needing extra prompting.

Where to find it:
You can update these anytime in the Data View, or simply confirm them when setting your project to Live to connect with everyday tools like Slack, Microsoft Teams, or ChatGPT.

Mar 25, 2026

Sometimes you need the blueprint of your project, not just the raw feedback data. We’ve added a new export option that allows you to download the structural overview of your Caplena projects directly to Excel.

This is especially useful for maintaining internal documentation, auditing your data architecture, or sharing project setups with stakeholders who don't need access to the granular text responses.

What’s included in the Excel export?

  • Project Overview: High-level details and settings of your current project.
  • Data Sources: A clear log of where your feedback is originating from.
  • Columns: The exact structure, naming conventions, and metadata of your dataset.

How to use it:

  1. Navigate to the Data view in your project.
  2. Click the Export icon (or trigger an export for your filtered rows).
  3. In the export modal, select the new Project Metadata tab.
  4. Hit Export to download your file.